地 线 应 与 大 地 联 接 良 好 . 地 线 的 作 用 不 但 可 起 到 机 壳 屏 蔽 以 降 低 噪 声 , 而 且 也 是 为 了 安 全 , 不 致 由 漏 电 而 引 起 触 电 . 感 受 电 极 用 于 四 电 极 体 系 . 用 时 和 工 作 电 极 的 夹 头 夹 在 一 起 . 四 电 极 对 于 大 电 流 ( 100 mA 以 上 ) 或 低 阻 抗 电 解 池 ( < 1 欧 姆 , 例 如 电 池 ) 十 分 重 要 , 可 消 除 由 于 电 缆 和 接 触 电 阻 引 起 的 测 量 误 差 . 当 用 于 三 电 极 体 系 时 , 感 受 电 极 应 荡 空 不 用 . 三 或 四 电 极 可 在 " 电 解 池 控 制 " 中 设 定 .
Tuesday, March 29, 2022
Sunday, March 20, 2022
格里菲斯能量平衡
根据热力学第一定律,当一个系统从非平衡态转为平衡态,能量会减少。Griffith将此概念应用于裂纹构建:
假定裂纹是由于作用于其表面上的力发生湮灭而形成的。湮灭瞬间,应变和势能有个初始值,但往往不稳定。如果湮灭瞬间是不稳定状态,根据最小势能原理,势能会在达到平衡过程中减小,如果湮灭瞬间处于平衡状态,势能则不发生变化。
Griffith认为,一个裂纹形成或者扩展只有在某个过程使系统能量减少或者不变时才会发生。 因此,断裂发生的时刻,裂纹往前扩展,材料处于平衡状态,且总能量不发生变化。

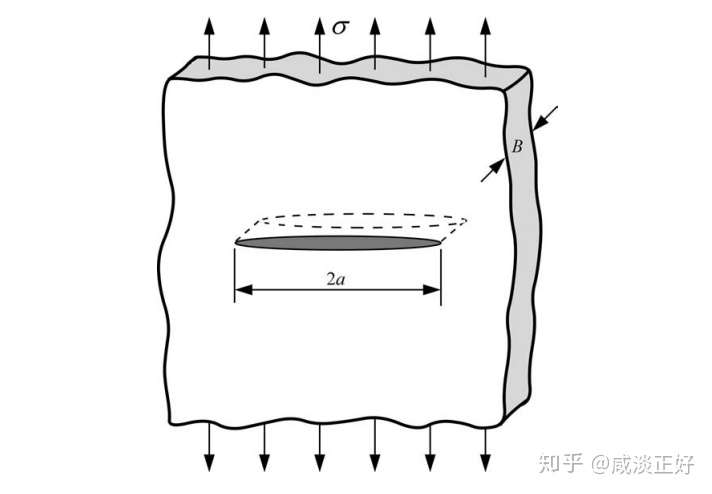
现在考虑一个平板承受远端拉伸应力σ作用,并包含一个长度为2a的裂纹,如上图所示。假设平板宽度W>>2a,且为平面应力状态。为使裂纹扩展,必须有足够的势能来克服材料的表面能。平衡状态下,裂纹扩展dA时,Griffith能量平衡理论表达如下:
或
其中E = 总能量
Π = 由内部应变能和外载荷导致的系统势能
Ws=产生裂纹表面所需功
对于上图中的裂纹体,Griffith采用Inglis的应力分析得到:
其中Π0无裂纹体平板,B平板厚度。由于裂纹产生了两个裂纹面,Ws由下式给出:
其中 γs为材料表面能,于是
以及
联立上述两式,求解可得
需要注意裂纹面积与表面面积的区别。
裂纹面积定义为裂纹面的投影面积(本例中为2aB),但裂纹包含两个面,因此表面面积为2A。
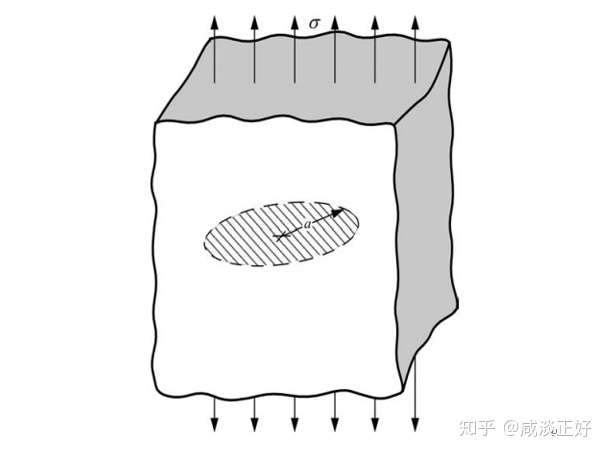
Griffith方法也可用于其他形状裂纹。例如下图中的硬币型裂纹体,其断裂应力为:
其中a为裂纹半径,ν是泊松比。

Wednesday, March 9, 2022
为win7右键菜单添加显示隐藏系统文件和扩展名的方法
最近一些用户反映,win7系统中要是能够在右键菜单中显示隐藏系统文件和文件扩展名就好了,其实方法是有的,小编这里就为大家找到一种实用的,windows7(64位)系统中为右键添加显示隐藏系统文件和文件扩展名的方法,大家可以尝试一下哦,具体步骤如下:
步骤一:首先新建一个文档,然后输入如下代码,并另存为:SuperHidden.reg
01
REGEDIT4
02
[HKEY_CLASSES_ROOT\Directory\Background\shellex\ContextMenuHandlers\SuperHidden]
03
@="{00000000-0000-0000-0000-000000000012}"
04
[HKEY_CLASSES_ROOT\CLSID\{00000000-0000-0000-0000-000000000012}\InProcServer32]
05
@=hex(2):25,53,79,73,74,65,6d,52,6f,6f,74,25,5c,73,79,73,74,65,6d,33,32,5c,73,\
06
68,64,6f,63,76,77,2e,64,6c,6c,00
07
"ThreadingModel"="Apartment"
08
[HKEY_CLASSES_ROOT\CLSID\{00000000-0000-0000-0000-000000000012}\Instance]
09
"CLSID"="{3f454f0e-42ae-4d7c-8ea3-328250d6e272}"
10
[HKEY_CLASSES_ROOT\CLSID\{00000000-0000-0000-0000-000000000012}\Instance\InitPropertyBag]
11
"method"="ShellExecute"
12
"Param1"="SuperHidden.vbs"
13
"command"="显示/隐藏系统文件+扩展名"
14
"CLSID"="{13709620-C279-11CE-A49E-444553540000}"
15
[HKEY_CURRENT_USER\Software\Microsoft\Windows\CurrentVersion\Explorer\Advanced]
16
"ShowSuperHidden"=dword:00000000
17
"Hidden"=dword:00000002
步骤二:然后再新建一个文档,输入代码后另存为:SuperHidden.vbs
01
'Show/Hide System Files
02
Dim WSHShell
03
Set WSHShell = WScript.CreateObject("WScript.Shell")
04
sTitle1 = "SSH=0"
05
sTitle2 = "SSH=1"
06
if WSHShell.RegRead("HKCU\Software\Microsoft\Windows\CurrentVersion\Explorer\Advanced\ShowSuperHidden") = 1 then
07
WSHShell.RegWrite "HKCU\Software\Microsoft\Windows\CurrentVersion\Explorer\Advanced\ShowSuperHidden", "0", "REG_DWORD"
08
WSHShell.RegWrite "HKCU\Software\Microsoft\Windows\CurrentVersion\Explorer\Advanced\Hidden", "2", "REG_DWORD"
09
WSHShell.RegWrite "HKCU\Software\Microsoft\Windows\CurrentVersion\Explorer\Advanced\HideFileExt", "1", "REG_DWORD"
10
WSHShell.RegWrite "HKCR\CLSID\{00000000-0000-0000-0000-000000000012}\Instance\InitPropertyBag\command", "显示系统文件+扩展名", "REG_SZ"
11
WSHShell.SendKeys "{F5}+{F10}e"
12
'WSHShell.Popup "Poof, they're gone!", 1, sTitle1, vbInformation
13
else
14
WSHShell.RegWrite "HKCU\Software\Microsoft\Windows\CurrentVersion\Explorer\Advanced\ShowSuperHidden", "1", "REG_DWORD"
15
WSHShell.RegWrite "HKCU\Software\Microsoft\Windows\CurrentVersion\Explorer\Advanced\Hidden", "1", "REG_DWORD"
16
WSHShell.RegWrite "HKCU\Software\Microsoft\Windows\CurrentVersion\Explorer\Advanced\HideFileExt", "0", "REG_DWORD"
17
WSHShell.RegWrite "HKCR\CLSID\{00000000-0000-0000-0000-000000000012}\Instance\InitPropertyBag\command", "隐藏系统文件+扩展名", "REG_SZ"
18
WSHShell.SendKeys "{F5}+{F10}e"
19
'WSHShell.Popup "Here they are!", 1, sTitle2, vbInformation
20
end if
21
Set WSHShell = Nothing
22
WScript.Quit(0)
步骤三:最后将SuperHidden.vbs拷贝到C盘windows目录下即可,然后双击SuperHidden.reg修改注册表,最后重启一下电脑就可以了!
http://www.xitongcheng.com/jiaocheng/win7_article_682.html
Monday, March 7, 2022
What is the difference between upper yield point and lower yield point?
When mild steel material is subjected to tension test, then it passes through various stages before fracture.
Discussion is limited to Plastic region only..
Beyond the elastic limit plastic deformation occurs and strains are not totally recoverable. There will be thus permanent deformation or permanent set when load is removed. These two points are termed as upper and lower yield points respectively.
From figure you can easily understand that, When ductile material is stretched beyond elastic point, material starts to show plastic behavior. A point at which Maximum load or stress required to initiate the plastic deformation of material such point is called as Upper yield point. And a point at which minimum load or stress required to maintain the plastic behavior of material such a point is called as Lower yield point.
Upper yield point is unstable in nature but lower yield point is stable in nature. so while designing the components we consider the lower yield point of material.
Upper yield point is the point after which the plastic deformation starts. This is due to the fact that the dislocations in the crystalline structure start moving. But after a while, the dislocations become too much in number and they restrict each others movement. This is called strain hardening and lower yield point is the point after which strain hardening begins.
https://www.quora.com/What-is-the-difference-between-upper-yield-point-and-lower-yield-point-of-a-stress-strain-curve-for-mild-steel
Friday, March 4, 2022
如何减小PPT中图片微动距离
难以纠正的偏差
有时,你想要调整某一对象在PPT中的位置,可是无论你如何使用键盘上的光标键进行调整,显而易见的偏差却无法避免。
就如同上图所示,原本希望火箭的头部与虚线重合。可是谅你怎么按光标键进行上下移动,两者就是没法重合。
网格线
打开网格线
为了方便调整对象在PPT中的位置和大小,微软为PPT设置了网格线这一辅助工具。点击PPT工具栏中的“视图”选项卡,并勾选“网格线”,你便可以看到一下的效果:
网格线是什么?
其实网格线的尺寸决定了使用键盘移动对象的最小值。
也就是说,在勾选对象与网格对齐的前提下,使用键盘移动对象一次的距离就是网格线的间距。
网格线的设置
1-屏幕上显示网格:
和在工具栏上勾选“网格线”的效果一样,显示或隐藏网格线
2- 网格的间距可以在此得到设置
3-对象与网格对齐:
启用这个选项会使你在移动对象时,对象“跳跃”至下一个网格线的节点。
4-屏幕上显示绘图参考线:
启用或关闭参考线进行辅助排版
5-形状对齐时显示智能向导:
启用这个功能后,你在移动对象时,会出现提示,帮助你将该对象与其他对象对齐。
偏差产生的原因
在勾选“对象与网络对齐”的前提下,由于每次使用键盘光标键就会使得对象,直接移动到下一个网格线节点。当一个对象正好处在网格中间位置,那么另一个对象则必然没有可能与之相重合。
解决方法
01 禁用“对象与网格对齐”
禁用该功能以后,每次按下光标键,对象仅会移动1个像素,而不会跳跃至下一个网格节点。
02 Ctrl + 光标键
在启用“对象与网格对齐”的情况下,按住Ctrl,再按光标键,则也可以使得对象进行像素级别的移动。
https://www.jianshu.com/p/92d0db3664fe
Thursday, March 3, 2022
Duckduckgo I am feeling lucky搜索引擎地址
Here is the formula for DuckDuckGo:
https://duckduckgo.com/?q=!ducky+searchterm+site%3Asiteurl
For example:
https://duckduckgo.com/?q=!ducky+LOL%20Cats+site%3Ayoutube.comFROM:https://webapps.stackexchange.com/questions/86132/url-for-im-feeling-lucky-within-specific-siteWednesday, March 2, 2022
惠普笔记本如何关闭触摸板
开始→设置→设备→鼠标和触摸板→其它鼠标选项→clickpad 设置
或者点 clickpad 禁用。